Archive
6 Essential Tips on How to Prevent Online Shopping Fraud
Dear readers and followers, I would first like to wish you a very Happy New Year, good health and great personal and professional accomplishments.
As some of you have already purchased products/services online (and I would like to invite you to share your experience with us) and some others will have at a some point, I am featuring today Israel Defeo as guest blogger on this common topic: Online shopping.
Shopping online is easy. You get what you want in a matter of seconds. Just input your credit card information and voila, that book or jacket or bag is already on its way to you within 24 hours.
This is why more shoppers are switching to e-stores and e-transactions—e-payments, e-banking—are fast becoming the norm. Convenience is the ultimate game-changer. Plenty of online shops, too, offer discounts and freebies like free delivery or free shipping.
However, the rise in e-transactions has also made online fraud possible. To prevent online shopping fraud from happening to you, here are some easy tips you can follow:
1. Keep your credit details a secret.
Like the famous quote said, “There are things better left unsaid.” That may be true especially if it’s about your credit, debit or other essential information that need to be kept secret.

2. Use caution when using your devices for online shopping.
Because it’s more convenient to shop online using smartphones, tablets, and other mobile devices with internet access, more consumers prefer to use these gadgets than computers and laptops—which are more secure. Beware of using your handheld devices for transactions that carry your personal and credit card information. In case your device is misplaced or lost, you’re at risk of falling victim to fraudsters and scammers who can extract your private information through the lost device.

3. Beware of phishing websites.
Have you ever seen items on some websites offered at very low prices? Though it can be tempting to purchase low-priced bargain items, it can also come at great risk to the safety of your credit and personal details.
There are internet criminals who create phishing or fraudulent websites which trick you into signing up and disclosing your private information. Some of these websites duplicate the content and design of legitimate ones to fool shoppers like you into revealing their credit card details. At this point, it may be better for you to let common sense—or your gut feel—rule. If you feel like the price is unbelievable or a deal sounds too good to be true, chances are, it is. Stay away from fishy-looking sites as much as possible to keep from being a victim of identity theft.
4. Verify if the website is legitimate or not.
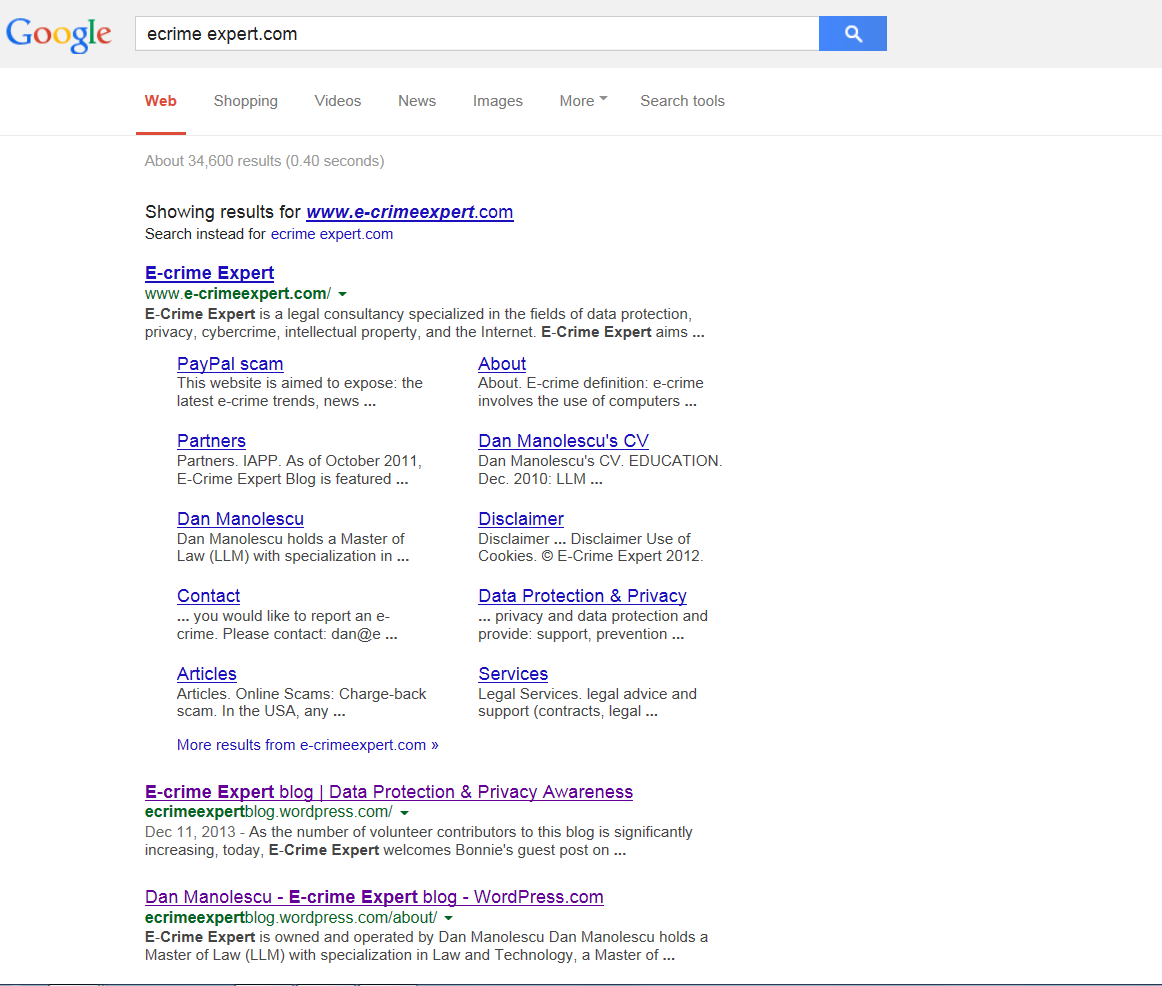
Remember, Google is your friend. This search engine can help you find any information you need to get your hands on. Search for the name of the website and see if there’s anything involving “scam” or “fraud” mentioned in blogs, forums or other online sources.
5. Don’t click hyperlinks from random emails.
You probably received not just one, not just two, but more emails about offers and discounts about a product or service in your email. Be mindful of clicking links attached to those messages because it may redirect you to fraudulent websites or phishing sites. Also beware of attachments you receive from untrusted sources. These may contain viruses and malwares that may not just harm your electronic devices, but can also swipe information from your units.
Sometimes, web mail servers can filter unreliable messages and put these messages in the Spam folder of your email. So make sure this feature is enabled in your settings.

6. Beware of bogus sellers lurking in social media sites
Social media sites are also used by small-scale entrepreneurs to market their products and promote their services to a wider audience. It has been an advantage to both sellers and buyers because Facebook, Twitter, Instagram and other social media platforms can be used for easy communication, placing orders, and completing transactions because it allows real-time responses.
However, scammers can easily post photos and create bogus accounts about bogus products or services. So be mindful of the sellers you buy from. If they cannot ship or send the product they promised after a transaction, you may have already been scammed. To avoid this fate, make sure to call up the seller before you even buy anything. If you smell or hear something fishy or that makes your antennae quiver in suspicion, go and search for another seller until you find one you can trust.
So be careful whenever you use your credit card. Follow the tips mentioned above to help you make sure your credit card and credit information are both safe—and to keep online fraud from happening to you.
This guest post is written by Israel Defeo. He is the writer and online promoter of the leading financial comparison website in Hong Kong, Money Hero. The online portal presents up-to-date and unbiased information about insurance companies, credit cards, loans, deposit accounts and broadband and mobile plans.
Any questions can be submitted to: dan@e-crimeexpert.com
Additional information can be found at: http://www.e-crimeexppert.com
To find out more about Dan Manolescu, visit his LinkedIn page here.
Hit the “subscribe” button in order to be notified when new videos and Articles are posted on this blog
Cyberbullying
As the number of volunteer contributors to this blog is significantly increasing, today, E-Crime Expert welcomes Bonnie’s guest post on Cyberbullying. A commanding new infographic from Besteducationdegrees.com is explaining the rate & causes of cyberbullying and is brought to you by Bonnie Moore. She is a freelance writer and blog junkie.
According to Bonnie, Cyberbullying is an online hazard through the use of electronic devices. It include harassing text messages or emails, rumours sent by email or posted on social networking sites, and embarrassing pictures, videos, websites, or fake profiles. It has become more common in society, particularly among young people and most of the young generations are facing cyber harassment.
Below is the Infographic created and shared by Bonnie.

Source: Best Education Degrees
To view the original Post click here.
Any questions can be submitted to: dan@e-crimeexpert.com
Additional information can be found at: http://www.e-crimeexppert.com
To find out more about Dan Manolescu, visit his LinkedIn page here.
Hit the “subscribe” button in order to be notified when new videos and Articles are posted on this blog
10 Ways to Prevent Your Identity From Being Stolen
Today, we welcome our guest Amanda Kostina who is a green living enthusiast and a blogger for withefence.com. She generally writes about green lifestyles, eco-friendly businesses, and frugal living. Amanda is always passionate about making the world a better place for the generations ahead.
Bellow, you can read Amanda’s interesting guest post on how to prevent identity theft.
One of the fastest growing crimes in the United States, identity theft affects millions of Americans. From phishing scams to taking advantage of the information in a lost or stolen wallet, criminals have a variety of options when it comes to methods of exploiting your information for their own gain. Fortunately, there are also a few simple steps you can take to protect yourself against their nefarious efforts, maintaining control over your own identity and preventing it from being stolen.

1.Clean Out Your Wallet – Many people keep their Social Security cards on their person for easy access, but this practice can easily put one of your most sensitive pieces of personal information into the hands of identity thieves if your wallet is stolen or becomes lost. Make a point of storing your Social Security card in a safe place other than your wallet, and of periodically clearing out any bits of paper bearing sensitive information.
2.Come Up With Creative PIN Numbers – Choosing your wedding anniversary or the birth date of a child for account pin numbers makes them easy to remember, but it also makes them relatively easy for would-be identity thieves to guess. A jumble of numbers or letters that have no connection to one another is ideal, as the random nature makes them much more difficult to suss out.
3.Memorize PIN Numbers – The major selling point of using an important date or significant number as the PIN on a financial account is ease of memorization, but that also makes them easy to guess. When you do come up with a secure PIN, don’t write it down and leave the slip of paper in your wallet or on your person, as that information would fall into the hands of an identity thief right along with the card it’s attached to if your wallet is ever stolen. Take the time to memorize the number instead.
4.Check Your Mail – Letting your mail pile up while you’re on vacation or simply forgetful can leave you with more than just a clogged mailbox. It can also up the chances of documents containing sensitive information being taken by an unscrupulous passerby. Make sure that you’re clearing the mailbox every day, or that you make arrangements for the postal service to hold your mail while you’re traveling.
5.Invest in a Document Shredder – Dropping sensitive documents into a shredder is the work of a moment, and it makes it much more difficult for criminals to steal discarded papers from your garbage can or recycling bin with sinister aims.
6.Monitor Account Activity – Opting out of paper statements from your bank and other financial institutions not only keeps your statement out of the mailbox, but also helps you to do your part for the environment by eliminating a bit of unnecessary paper use. Instead, check your statements and monitor activity online. You’ll be able to keep an eye on your account any time you like, and you won’t be leaving personal information on a statement that’s up for grabs to any thief in the area.
7.Check Your Credit Report Annually – By federal law, you are entitled to one free credit report each year. It’s wise to take advantage of that right, not only to keep an eye on your rating, but also to check for signs of old identity theft or fraudulent activity.
8.Install Anti-Virus Software – Your computer makes paperless billing and statements available, allows you to conduct transactions from the comfort of your home and is an indispensible tool for the modern American. Without proper anti-virus and security software, it’s also an open invitation for identity theft and fraud. Make sure that you’re running up-to-date and reliable software to protect your PC, too.
9.Be Cautious Online – Whether you’re looking for work online or applying for financing, there are a wide variety of helpful tools to be found on the Internet. Unfortunately, there can also be a minefield of potential issues for those who aren’t cautious in their online dealings. Make sure that you’re only sharing sensitive information with reputable sources.
10.Practice Smart Phone Strategies – Unless you initiated a phone call and are sure you’ve reached the intended party, it’s wise to make a practice of never providing personal information over the phone. This especially holds true with unsolicited sales or marketing calls, because you can’t always be sure that the person on the other end of the line is a legitimate representative. To be safe, decline any offers that would require the sharing of your social security number, financial account details or other sensitive information.
Source: Amanda Kostina for: whitefence.com
To view the original Post click here.
Any questions can be submitted to: dan@e-crimeexpert.com
Additional information can be found at: http://www.e-crimeexppert.com
To find out more about Dan Manolescu, visit his LinkedIn page here.
Hit the “subscribe” button in order to be notified when new videos and Articles are posted on this blog
Infographic-Privacy and Security on Facebook
Today, E-Crime Expert has Naomi Paton as guest blogger. She is a passionate writer and loves to write articles related to internet, teen & amp; crime. She writes for Best Computer Science Schools.
The majority of today’s populace uses the internet and social media on a regular basis, but at what cost? Although there has been some research conducted representing the negative effects of internet addiction, less is known about how young adults are being affected by misuse of facebook like bulling, reputation damage, burglary etc.
Bellow is the infographic, created by Naomi Paton, which listed the researched data and the do and don’t facts on Facebook.

Source: BestComputerScienceSchools.net
To view the original Post click here.
Any questions can be submitted to: dan@e-crimeexpert.com
Additional information can be found at: http://www.e-crimeexppert.com
To find out more about Dan Manolescu, visit his LinkedIn page here.
Hit the “subscribe” button in order to be notified when new videos and Articles are posted on this blog

Important security settings on Facebook
Information security is important. Remember that: Without security there is no privacy!Today, E-Crime Expert presents several security measures Facebook has in place for securing your private data and account.
1. Change your password (Frequently)
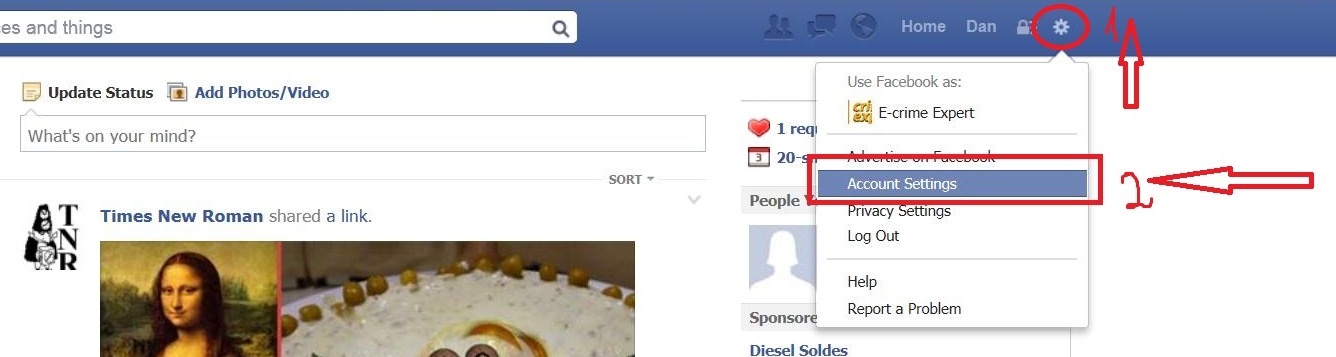
i. Log on your Facebook Account, go to (click) “Settings” (1)and then click on “Account settings” (2) from the fold down menu(Fig.1).
Fig. 1
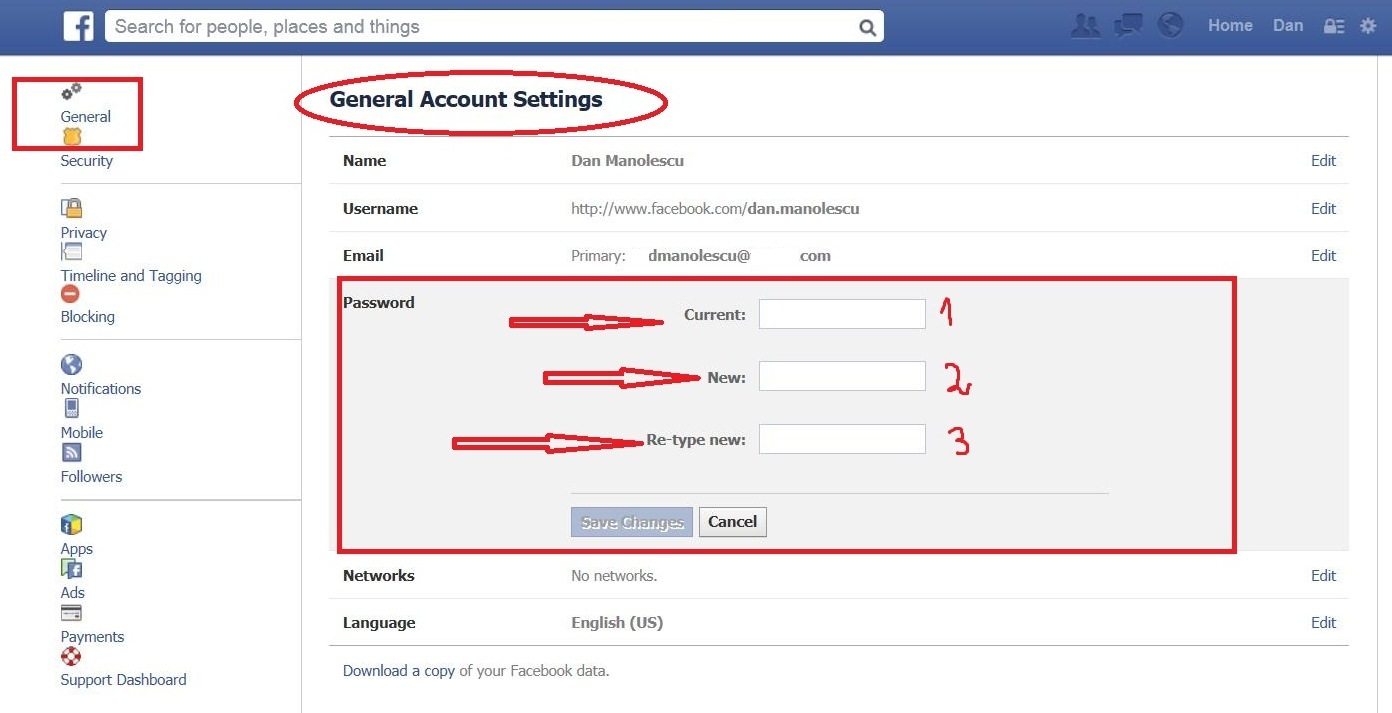
ii. Go to and select the “General Settings” menu on the left and then click on the “Edit” tab from the Password field (on the right side of the page). See Fig.2.
Fig. 2

iii. Now, you have to follow the three steps bellow:
-type your current password (for security reasons);
-type your new password (check this blog post here on how to have a strong password);
-type your new password again.
Click “Change password” and your password will be changed. (Fig.3).
Fig.3.
iv. In order to be sure your password is effectively changed on all your devices, select the “Log me out of other devices” box, click on the “Submit” button from the displayed message that appears after you changed your password. That will enable you to sign out from all the devices you are automaticaley logged on. In this way, once you use them again, you will be prompted to type your new password. This is an extra security measure which enables you to protect your information if one of your devices got lost or stollen or when it is shared with other people (Fig. 4).
Fig. 4.

2. Check your active sessions
i. You can also check from where you logged on your account lately.
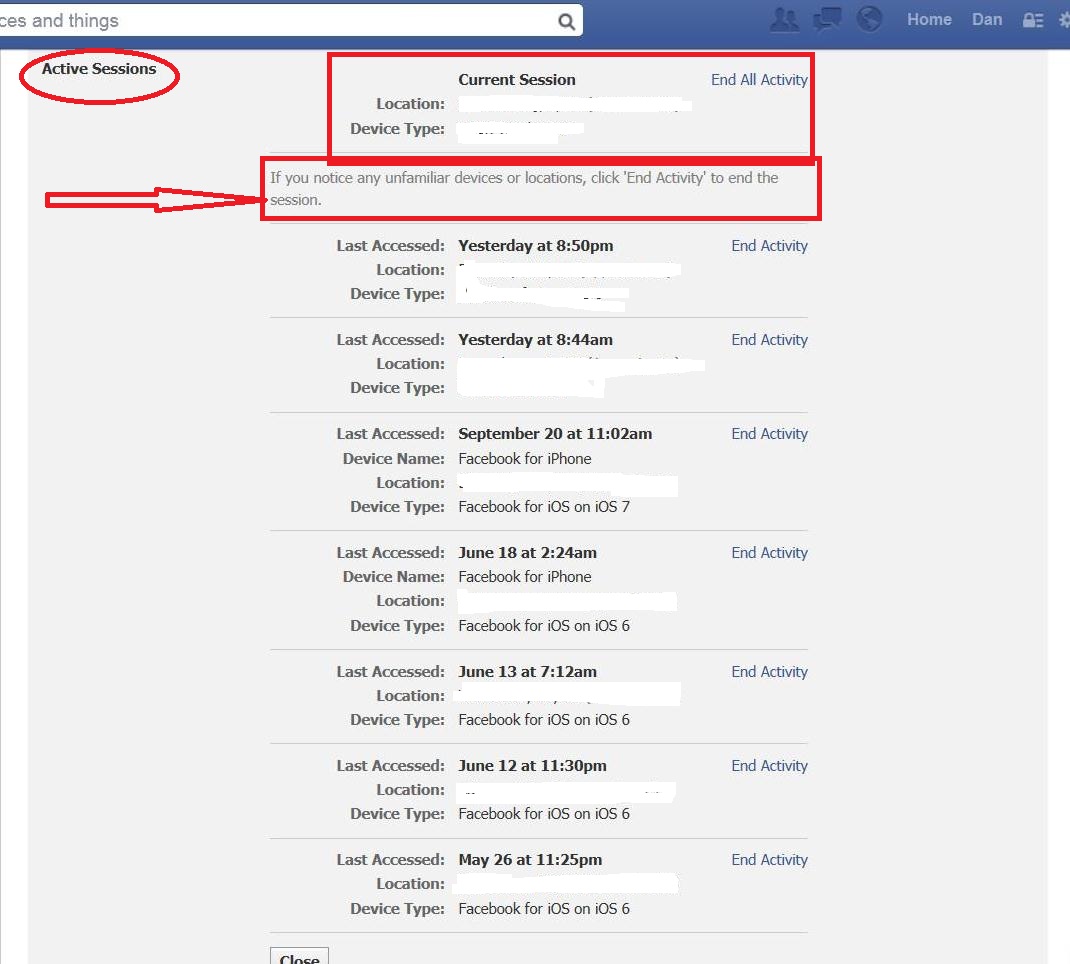
Click on the “Security settings” tab (see pictures above for how to get there) on the left and then go to the right-bottom of the page and select “Edit” from the “Active sessions” menu (Fig.5)
Fig.5

ii. Now, you can check from where you are logged on during the current session (top of the page) and also, you can check bellow from where you were logged on in your previous sessions.
*Note: if you notice that you appeared logged on from countries you never been or you have not been lately or from devices you do not use that means someone else logged on your account without authorization (Fig.6).
**If you notice any unfamiliar devices or locations, click ‘End Activity’ to end the session and automatically log out someone who’s using your account fraudulently.
Change your password immediately as explained under section 1 of this Blog post!
Fig.6
3. Secure browsing.
i. Go to “Security settings“, as explained above, find the “Login Notifications” menu and click “Edit“. (Fig.7)
Fig.7

ii. Then you can select either “Email” or “Text message“. Or you can always select both! Click “Save changes“.
This will enable you to be notified via email or text message when your Facebook account is accessed from a device that you do not recognize (Fig.8).
Fig.8

iii. Furthermore, you could set up a Log in approval used when login into your account from unknown devices.
Go to “Security settings” (see above) and from there to “Login approvals” (bellow to “Login Notifications”). Click “Edit” and then select the box that reads: “Require a security code to access my account from unknown browsers“. Don’t forget to click “Save changes“. Now you are set for receiving notifications or be prompted a code (that will be delivered via your email or text message as a one-time token) before logging into your Facebook account, from unknown devices (Fig.9).
In order to learn what an unknown or unrecognized device means, keep reading this post bellow.
Fig.9

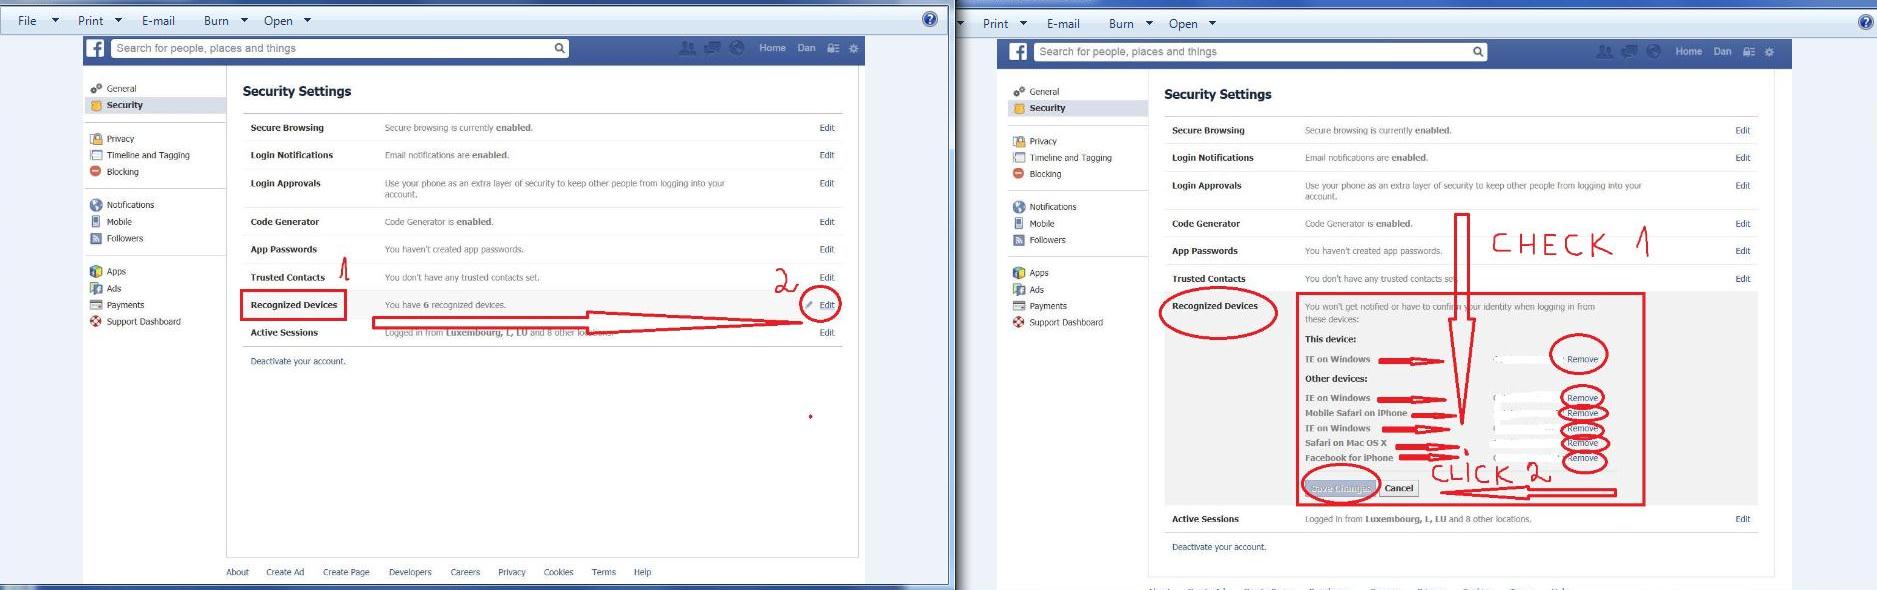
4. Recognized devices.
You can always set up the devices of your choice when using Facebook.
Go to “Security Settings” (as explained above), click “Edit” on the “Recognized Devices” menu and see which your recognized devices are. Devices will be assigned to your account as recognized when you will first time log on your Facebook account (using a new password) from a certain device (You will be prompted with a message whether you would like to save a certain devices as a recognized device or not). Be careful; do not select as a “Recognized Devices” a computer from school, work, public library or hotel. For this reason and in order to check which are your recognized devices check that menu and see if the devices listed there are the one you trust. If not, you just simply click “Remove” on the right side of a particular device (for example when there is listed a device you used once in a library).
Don’t forget to click “Save changes” as usually (Fig.10).
Fig.10
5. Trusted friends
i. To get set up, visit your “Security Settings” (as explained above), where you can select three to five friends to be your trusted contacts.
Find “Trusted contacts” and click on “Edit” and then on “Chose trusted contacts“(Fig. 11).
Fig.11

ii. Type the names of 3-5 of your trusted friends. You can select them one by one.
Don’t forget to click “Confirm” (Fig.12).
To select good trusted contacts:
– Choose people you trust, like friends you’d give a spare key to your house.
– Choose people you can reach without using Facebook, ideally over the phone or in person, since you’ll need to contact them when you can’t log in.
– Choose more people to help you. The more friends you choose, the more people who can help you when you need it.
Fig.12

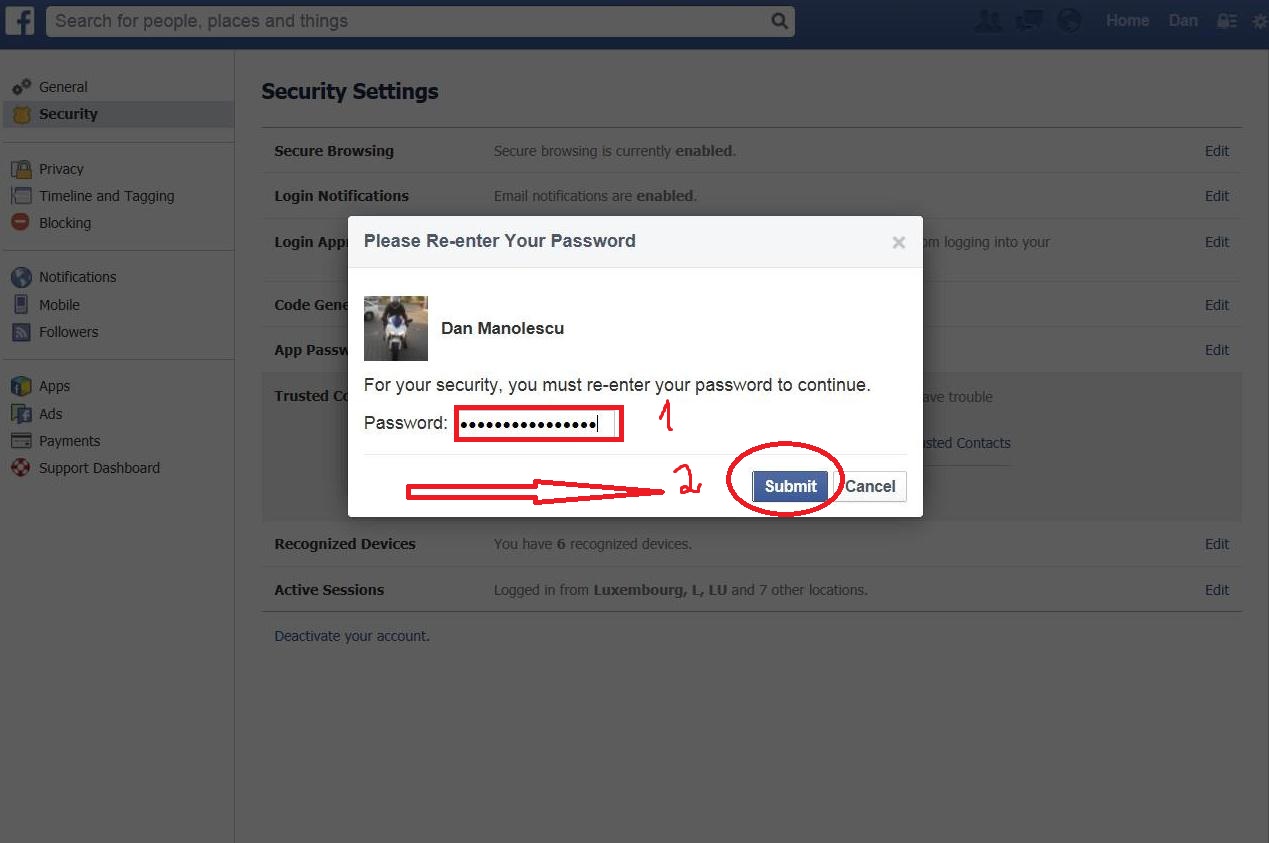
iii. As a security measures you’ll be prompted to introduce your account password (even if you are already logged on). Click “Submit” after you are done ( Fig. 13).
Fig. 13
iv. Immediately after, your trusted friends will appear under “Trusted Contacts“. You can now use them all, remove one or all if not pleased with your choice (Fig.14).
Fig.14

v. In order to make sure you are the one who made the selection of your trusted friends, Facebook sends you a message (check your mailbox linked to your Facebook account) confirming you added trusted friends (Fig.15).
If you did not do it, then someone most likely hacked into your account. Change your password immediately!
Fig.15

vi. Using Trusted Contacts
Once you’ve set up your trusted contacts, if you ever have trouble logging in, you’ll have your trusted contacts as an option to help. You just need to call your trusted contacts and let them know you need their help to regain access to your account. Each of them can get a security code for you with instructions on how to help you. Once you get three security codes from your trusted contacts, you can enter them into Facebook to recover your account.
With trusted contacts, there’s no need to worry about remembering the answer to your security question or filling out long web forms to prove who you are. You can recover your account with help from your friends.
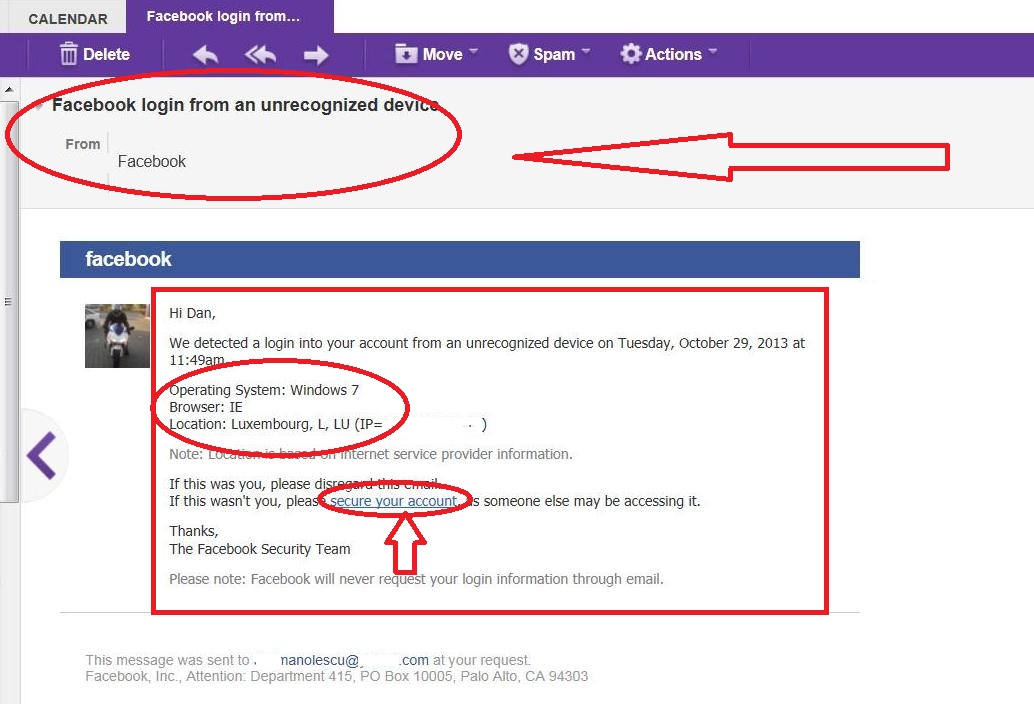
***Note: If you have set up your secure browsing, login notifications and chose your recognized devices and you receive an email from Facebook notifying you that someone tried to log on your account on X day from Y location using Z device (and none of those are related to you), then Change your password immediately (as explained under section 1 of this Blog post), because definitely someone tried or succeeded to fraudulently log into your account! (See example in Fig.16).
Fig.16
Any questions can be submitted to: dan@e-crimeexpert.com
Additional information can be found at: http://www.e-crimeexppert.com
To find out more about Dan Manolescu, visit his LinkedIn page here.
Hit the “subscribe” button in order to be notified when new videos and Articles are posted on this blog
How to download your own data from Facebook
From the same series on how to access, delete, download, transfer your data when using a major Online Social Service (Facebook) or email Provider (i.e. Google, Yahoo), today E-Crime Expert explains how a user can have access and also download his/her data Facebook collects and keeps under that particular user account.
Follow the steps bellow if you would like to have access to the data Facebook holds under your account:
1. Log on Facebook and access the “Settings” tab. From there, click on the “Account settings” from the drop-down menu (Fig. 1).
Fig. 1.

2. Navigate to the “General Account Settings” tab and click on the “Download a copy of your Facebook data” (on the bottom of the page). Fig. 2.
Fig. 2.

3. You will be promoted with a message that enables you to download your data. Also, Facebook warns the users in regards to the sensitive character of the data under their personal Facebook account. Think twice before downloading your data if you do not trust the computer you are using (i.e. Public Library, etc.). If you do trust it, just click the “Download archive” button in order to get access to your data. Fig. 3.
Fig. 3.

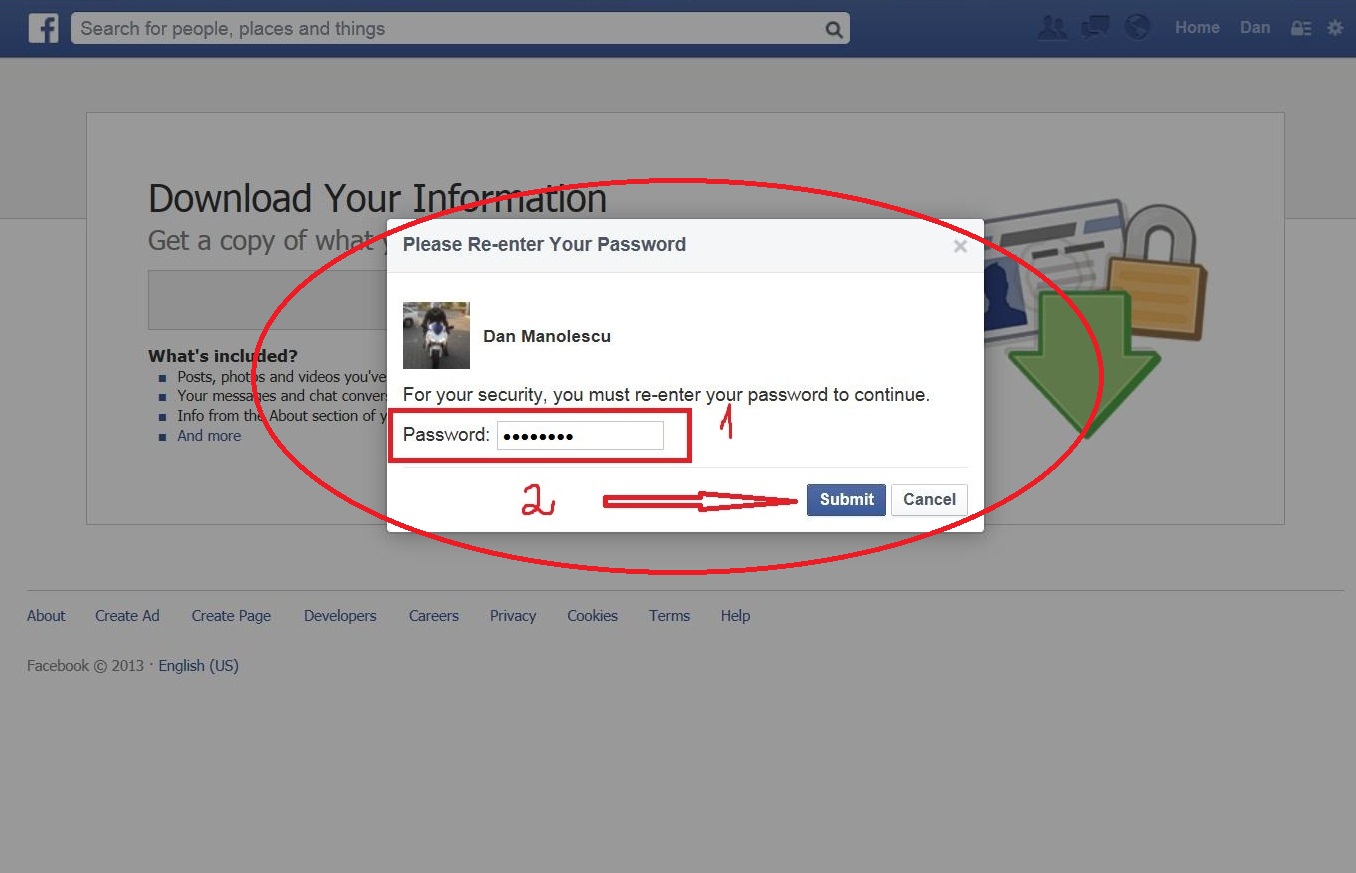
4. Next, you will need to type your password again, even though you are logged into your account (for security reasons). After typing your password, click on the “Submit” button. (Fig. 4).
Fig.4.
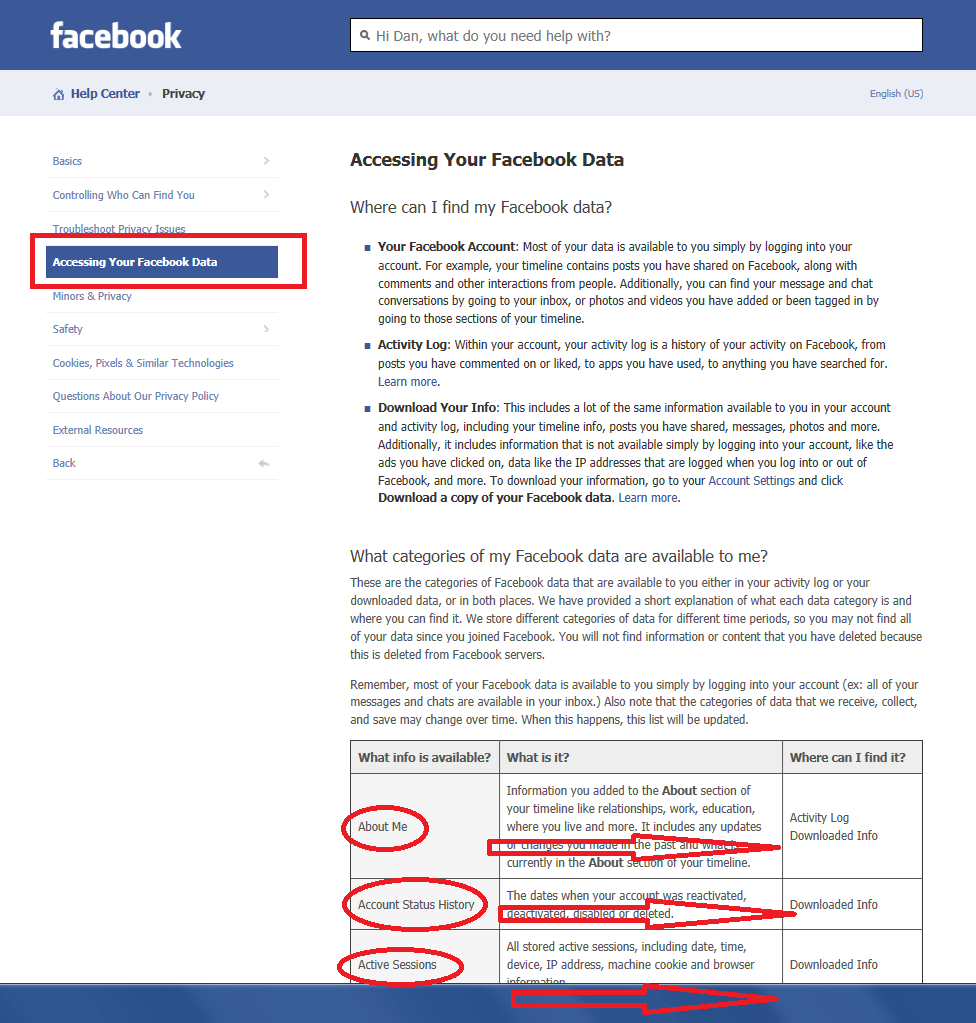
5. Again, a message is displayed informing the user which data will be downloaded: Pictures, archives, messages, timeline posts, AND MORE! (Fig. 5).
Fig. 5.

6. Also, you can manually chose to select what data you would like to download such as: photos, messages, videos, etc. For this, click here and you will be automatically redirected to another page where you could select what data you want to download (Fig.6). Or you could also click on the “And more” tab as shown in Fig.5 above.
Fig.6.
7. Now, depending on your Operating System (i.e. Windows or Apple), or your Browser (i.e. Internet Explorer or Safari) and also on the time elapsed since you last requested your data from Facebook (if ever), your data will either start downloading immediately to your computer or it will be sent to the email address associated with your Facebook account. We are explaining bellow both possibilities:
I. Data starts downloading immediately.
After clicking the “Submit” button (see Fig. 4 above), you will be prompted to save your data on your computer. Chose a location you are familiar with and also which it is neither public nor shared with other users and click “Save”. Your data will start downloading automatically. (Fig.7).
Fig.7.
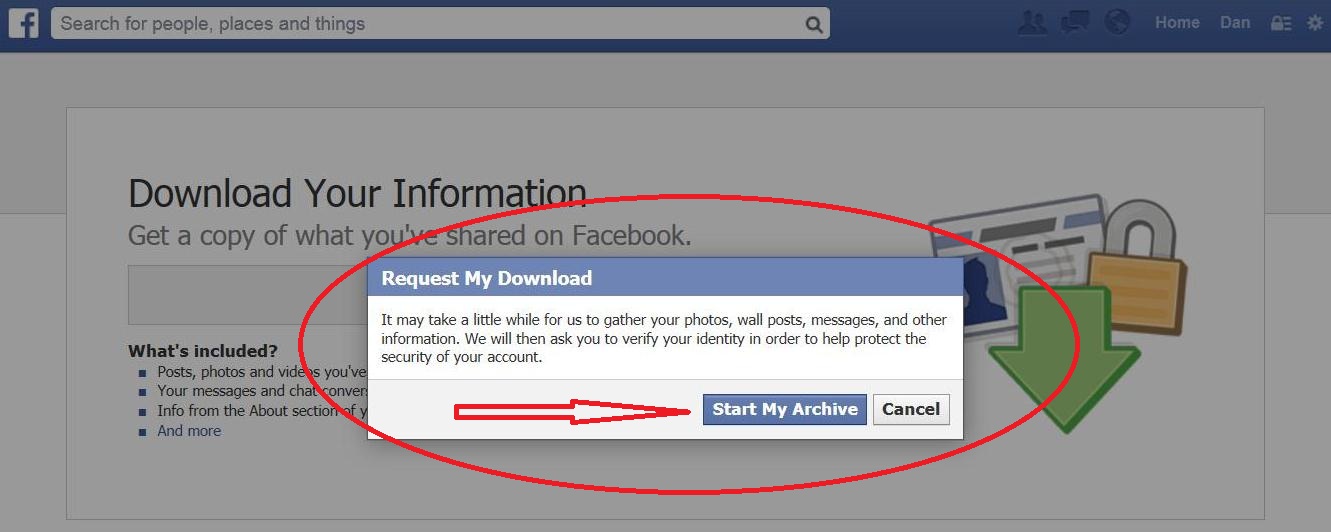
II. Data is sent to the email address associated with your Facebook account.
You will be prompted with another message called “Start my archive”. Click on it. (Fig. 8).
Fig.8.
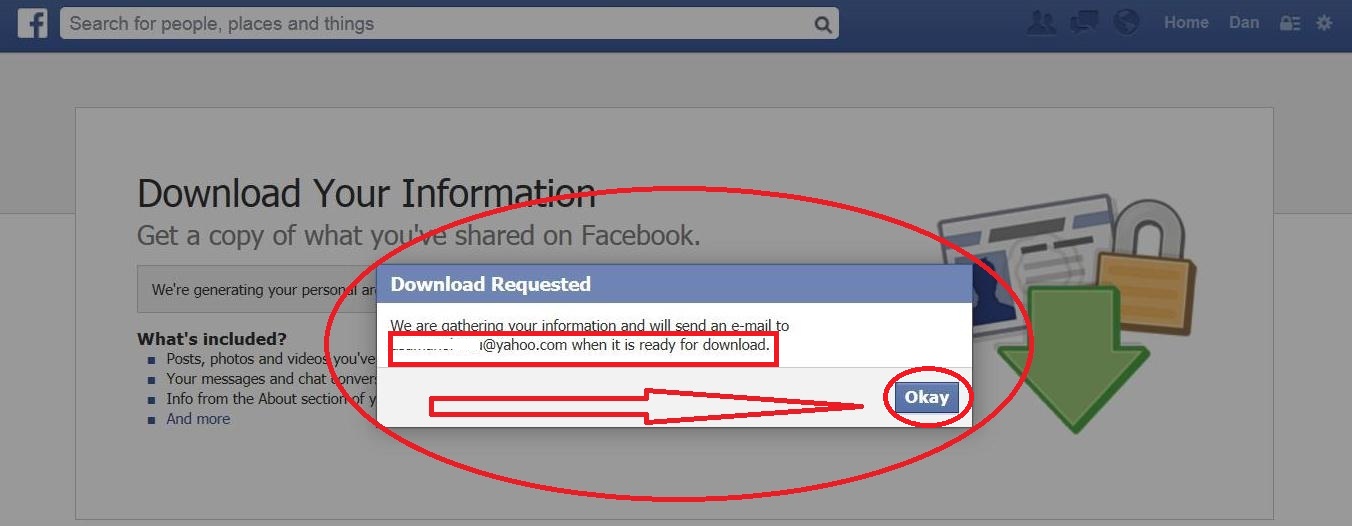
-The email address associate with your Facebook account is displayed in order for the user to confirm that this is the right email address. If so, click on “Okay”. (Fig. 9).
Fig.9.
-Check your Inbox folder (under your email account) and click on the message received from Facebook. On the bottom of the message you will find a link similar to this: https://www.facebook.com/joe.doexfnr11……..Qdxwe…..rlaA9LVP. Click on it. (Fig. 10).
Fig.10.

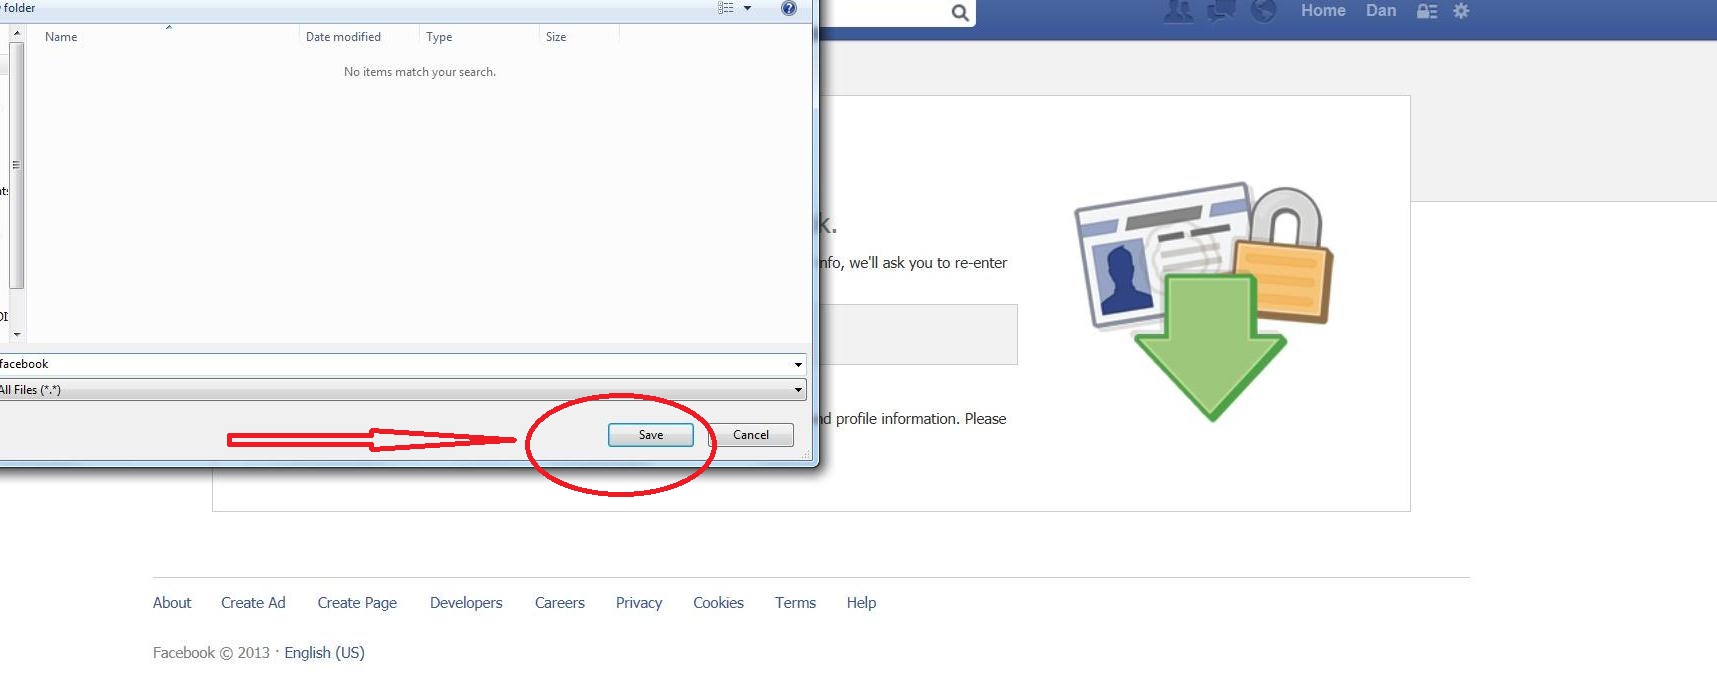
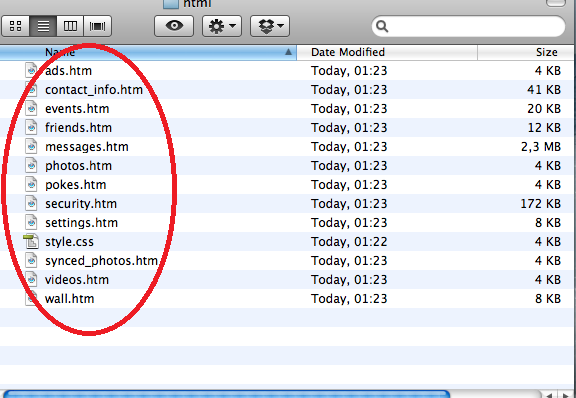
-Again, be careful and chose a location you are familiar with and also which it is neither public nor shared with other users and click “Save”. Your data will start downloading automatically. The folder with your Facebook data will look like in the pictures bellow. (Fig. 11 and 12).
Fig. 11.

Fig.12.
Any questions can be submitted to: dan@e-crimeexpert.com
Additional information can be found at: http://www.e-crimeexppert.com
To find out more about Dan Manolescu, visit his LinkedIn page here.
Hit the “subscribe” button in order to be notified when new videos and Articles are posted on this blog
How to: Deactivate, Delete, Memorialize or Remove a Facebook account
Continuing a series started this summer about how Google (original post here) and Yahoo users (original post here) could control their data, E-Crime Expert presents today how Facebook users could control their data by having their accounts deactivated, memorialized or deleted.
Facebook does not disable profiles if they are not being actively used as Yahoo does.
The only way a Facebook account closes is if the user chooses to disable it (deactivate or delete); or when a family members for example (i.e. of a deceased account holder) requests the memorializing or removing of an account; or as a result of a breach of Facebook terms and policies.
1. Deactivate your account
1) Log on your Facebook account, click on the “Settings” pictogram (step 1) and then select “Account settings” (step 2) from the drop-down menu (Fig. 1).
Fig. 1

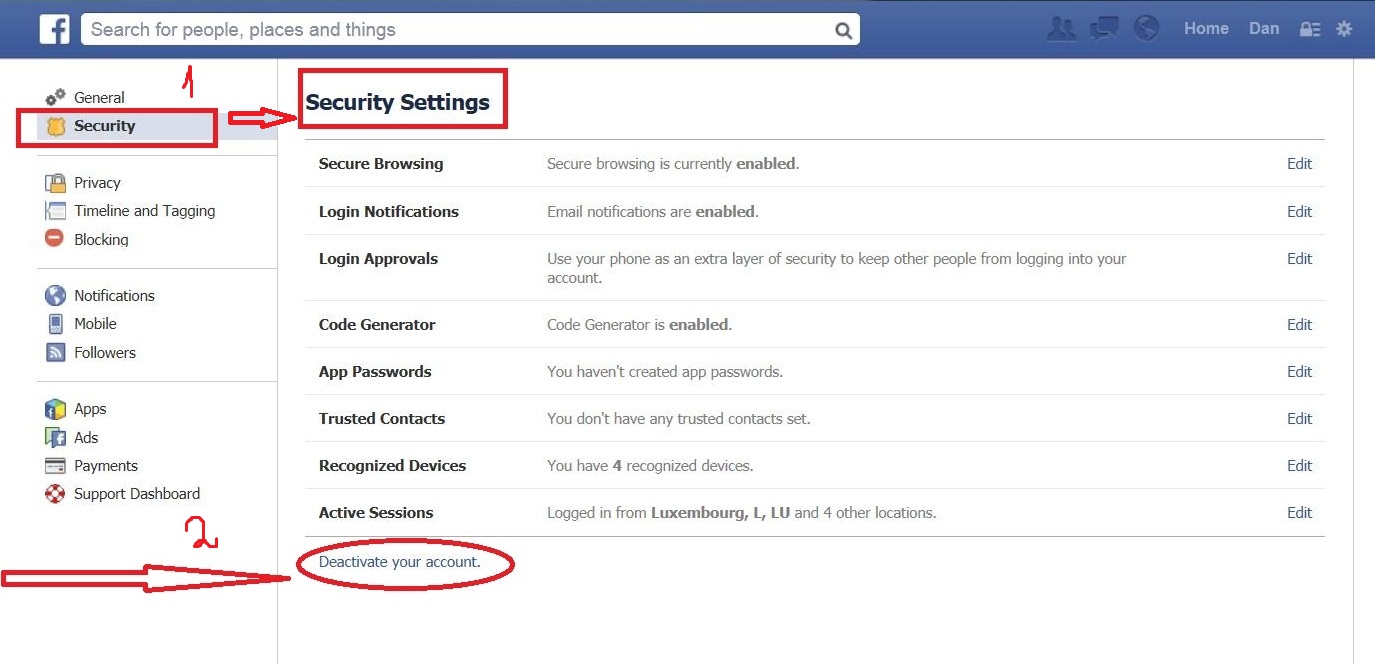
2) Chose the “Security” (step 1) tab on the left side menu (then “Security settings” will display on the right), go to the bottom of the “Security settings” menu where you’ll see the “Deactivate your account” button (Fig.2). Click on it (step 2).
Fig. 2
3) A new page will be displayed, chose one of the reasons you are disabling your account (Step 1), check the “Opt out” box if you do not want to further receive emails from Facebook (Step 2) and then click on “Confirm” (Step 3). Fig. 3.
Fig. 3

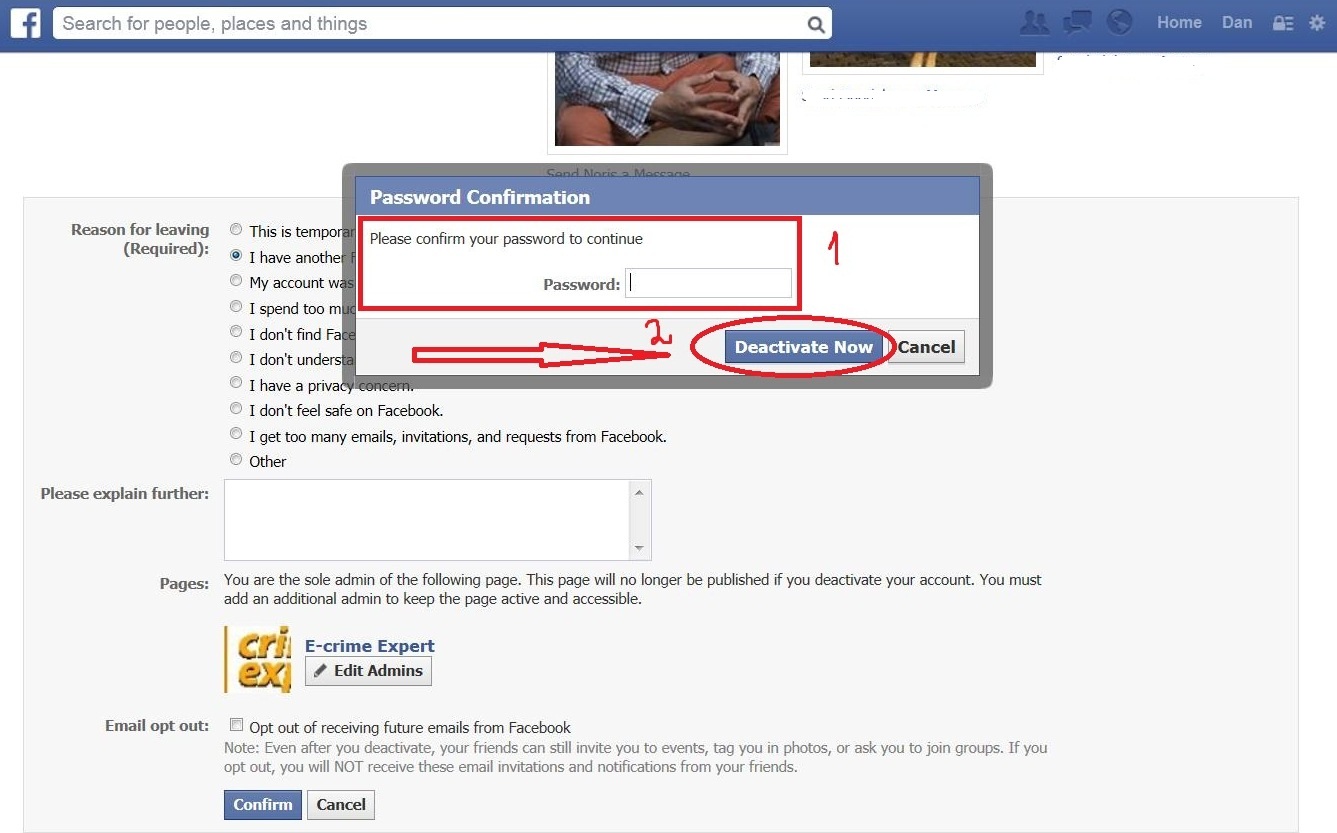
4) A pop-up Notification will appear prompting you (for security reasons) to introduce your password (Step 1). After introducing your password click on the “Deactivate Now” button (Step 2) as described below in Fig. 4.
Subsequently, your account will be deactivated.
Fig. 4
When you deactivate your account, your timeline and all information associated with it disappears from Facebook immediately. People on Facebook will not be able to search for you or view any of your information.
If you’d like to come back to Facebook anytime after you’ve deactivated your account, you can reactivate your account by logging in with your email and password. Your timeline will be restored in its entirety (friends, photos, interests, etc.). You will need to have access to the login email address for your account in order to reactivate it.
2) Delete your account
Directly click on this link.
Or follow the steps bellow if you are not logged in your Facebook account:
1) Log on your Facebook account, clcik “Settings” (Step 1) and then click on “Help” (Step 2) from the drop-down menu (Fig.5).
Fig. 5

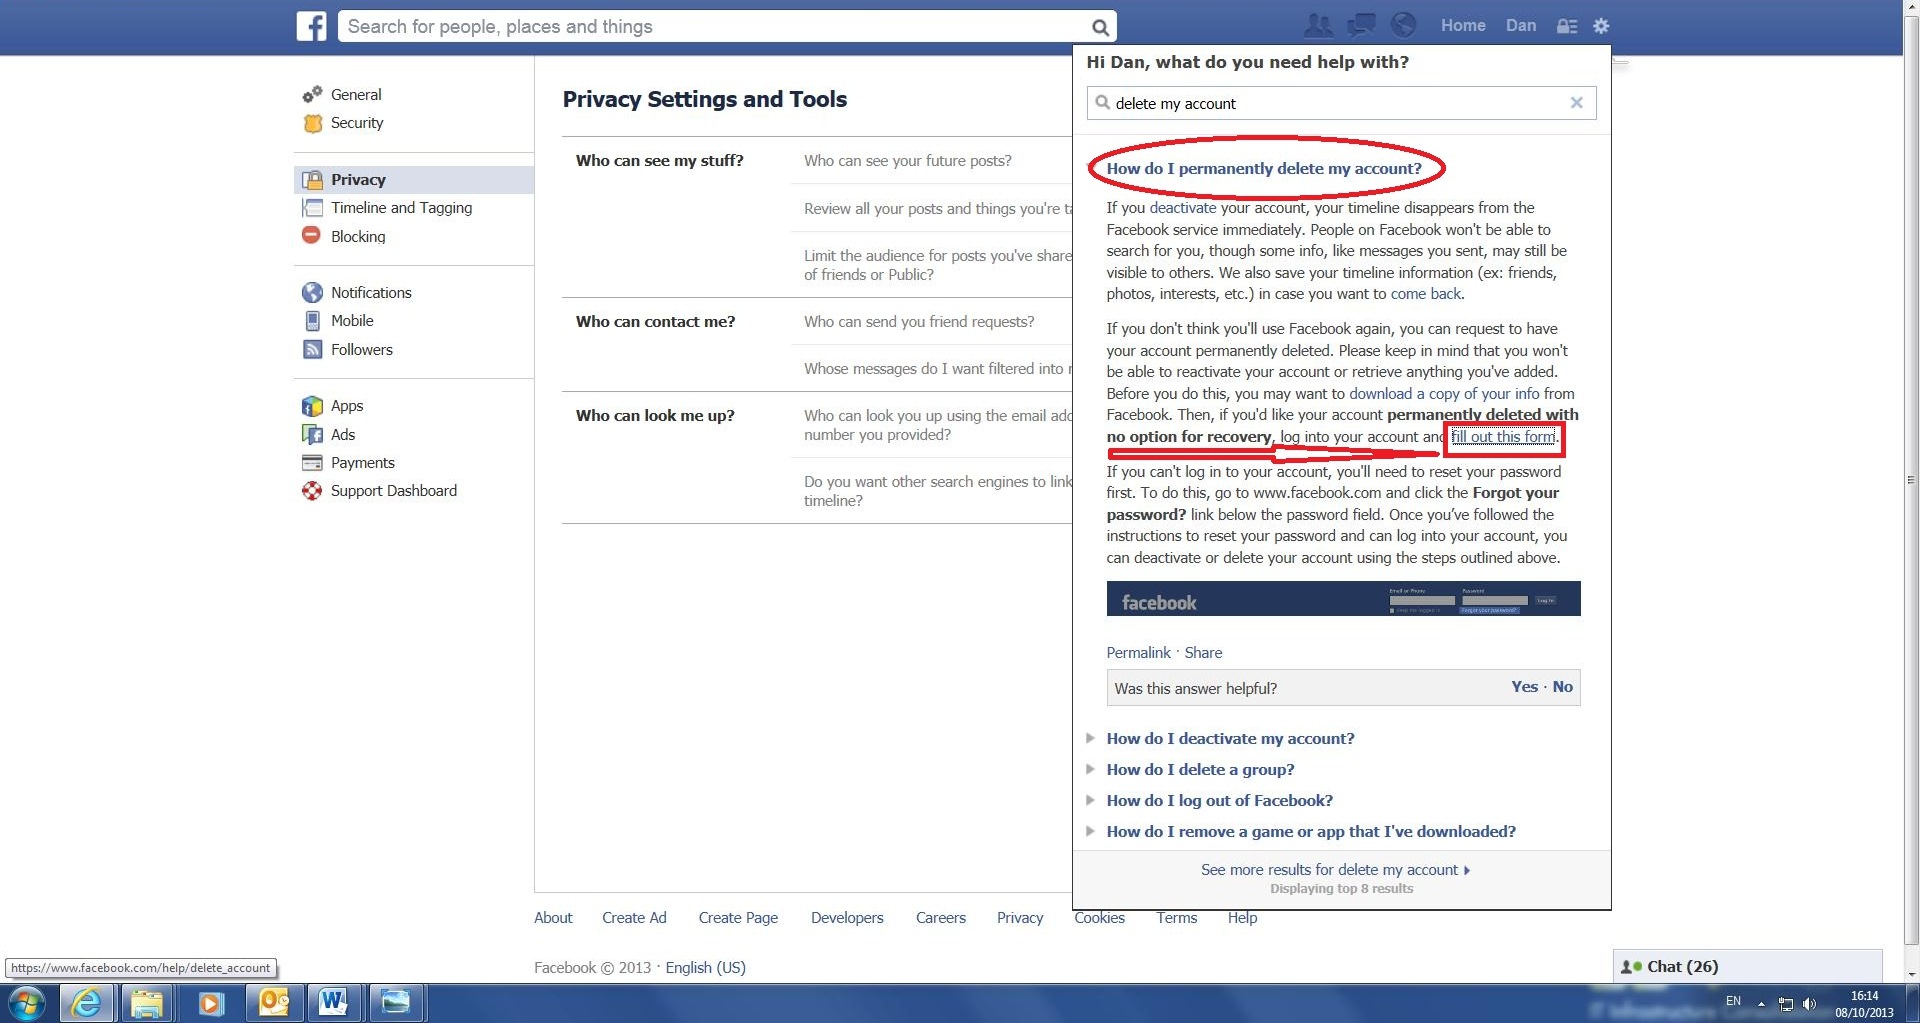
2) Type in the search box (Step 1): “Delete my account” and then click on the “How do I permanently delete my account” (Step 2) link from the options displayed in the drop-down menu (Fig.6).
Fig. 6

3) A new menu will open where you need to click on the “Fill out this form” (The red box illustrate in Fig. 7)
Fig. 7
4) The last step requires you to click on “Delete My Account” button displayed (Fig.8).
Fig. 8
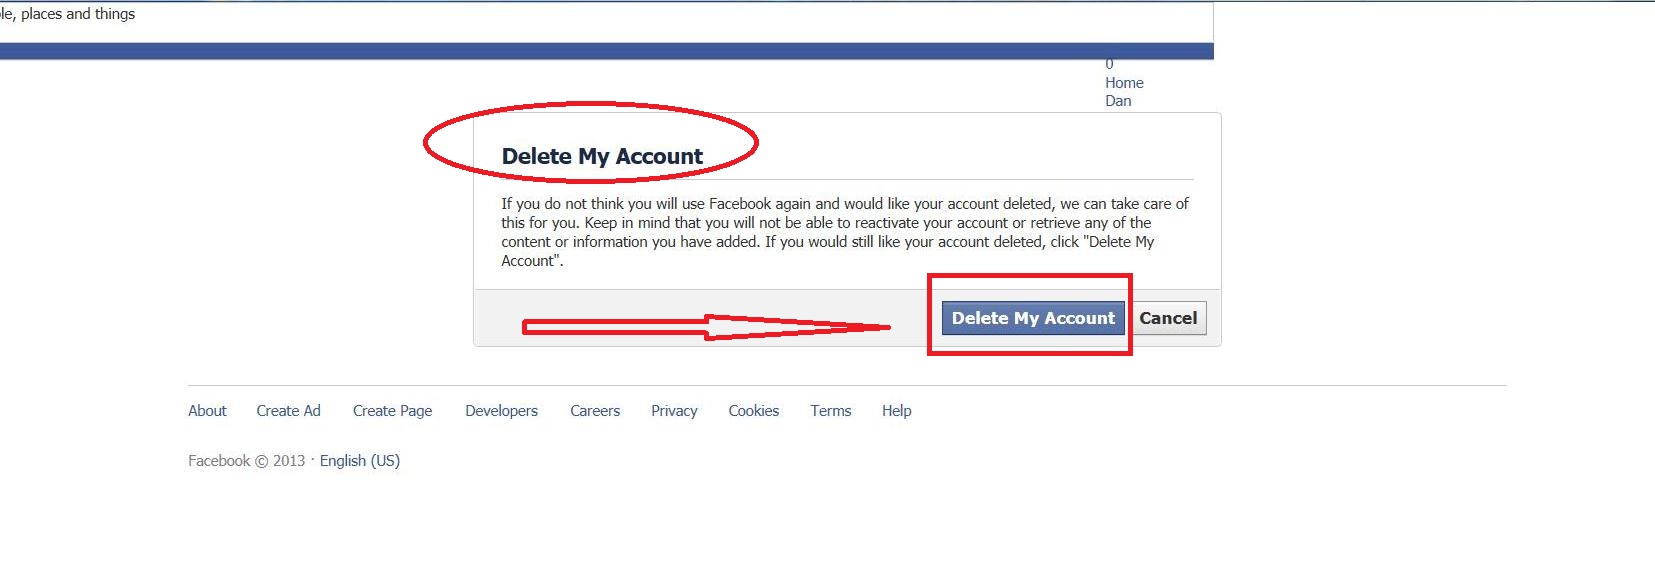
Permanently deleting your account means you will not ever be able to reactivate or retrieve any of the content or information you’ve added. Your account will be permanently deleted with no option for recovery.
3) Memorializing Accounts
When a person passes away, Facebook memorialize their account to protect their privacy. Here are some of the key features of memorialized accounts:
• No one can log into a memorialized account and no new friends can be accepted
• Depending on the privacy settings of the deceased person’s account, friends can share memories on the memorialized timeline
• Anyone can send private messages to the deceased person
• Content the deceased person shared (ex: photos, posts) remains on Facebook and is visible to the audience it was shared with
• Memorialized timelines don’t appear in People You May Know and other suggestions
If you need to report a timeline to be memorialized, please contact Facebook here.
And follow the 5 steps bellow (Fig. 9)
1. Link to the timeline of the person you submit the request for;
2. Insert the email address of the account you submit the request for;
3. Indicate your relationship status with that person;
4. Insert a link to a public/private commemoration of the deceased person (i.e. obituary or news). Please consider to NOT upload videos or pictures;
5. Click on memorialize account.
Fig. 9

4) Removing the account of a deceased person
Verified immediate family members may request the removal of a loved one’s account from Facebook by clicking here.
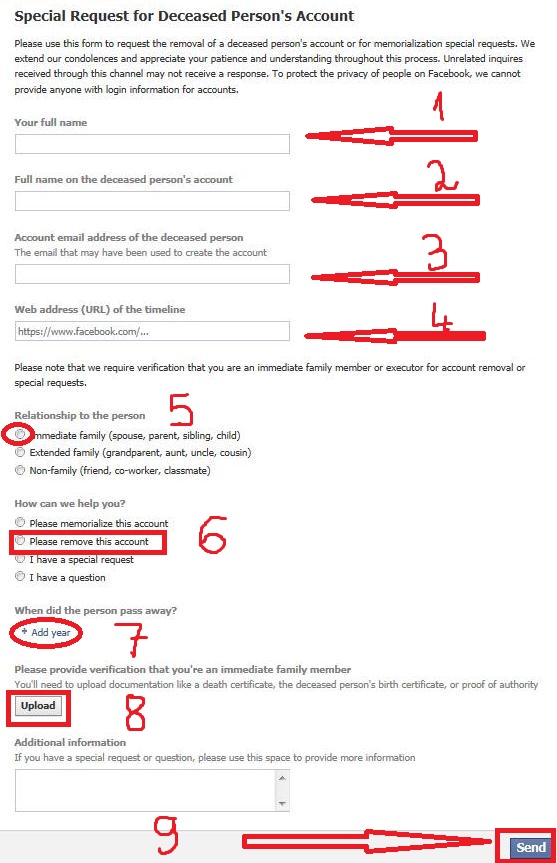
In order to complete this process, follow the 9 steps bellow (Fig. 10):
1. Introduce your full name;
2. Introduce the full name of the deceased person;
3. Introduce the email account (linked to their Facebook account) of the deceased person;
4. Introduce the web address of their timeline like this: https://www.facebook.com/john.doe
! Replace the john.doe example with the name of your deceased friend.
5. Indicate your relationship to that person;
6. Click on the “Please remove the account” field.
7. Indicate the year when that person passed away;
8. Make proof of your relationship with the deceased by uploading a death certificate or similar;
9. Last step: click “Send”
Fig. 10
Any questions can be submitted to: dan@e-crimeexpert.com
Additional information can be found at: http://www.e-crimeexppert.com
To find out more about Dan Manolescu, visit his LinkedIn page here.
Hit the “subscribe” button in order to be notified when new videos and Articles are posted on this blog
iOS7 Security issues give access to your photos and more
E-Crime Expert brings once again to your attention a security issue, thanks to Jose Rodriguez, from Canary Islands which has found this iOS7 Security glitch that gives access to your photos, and enables the sharing of them via Twitter, Mail, Flickr, Message.
The following demo, pictures and testing is done entirely by E-Crime Expert (Dan Manolescu) on one of our devices. This security issues apply to any Apple device (iPhone, Ipad) that runs on iOS7.
How it works:
From the locked screen menu (Fig.1), pull the “Control center” tab up (Fig.2) and click the “Clock” pictogram (Fig.3)
Fig.1

Fig.2

Fig.3

Then, press the “sleep button” until “turn off your device” (Fig.4) message appears. Instead, press “cancel” and right after double click the Home button (Fig.5).
Fig.4

Fig.5

The “Multitasking” screen will appear (Fig.6). You can now chose the “Camera” app from there and click the “Camera roll” (Fig.7) and you will instantly have access to your photos (Fig.8).
Fig.6
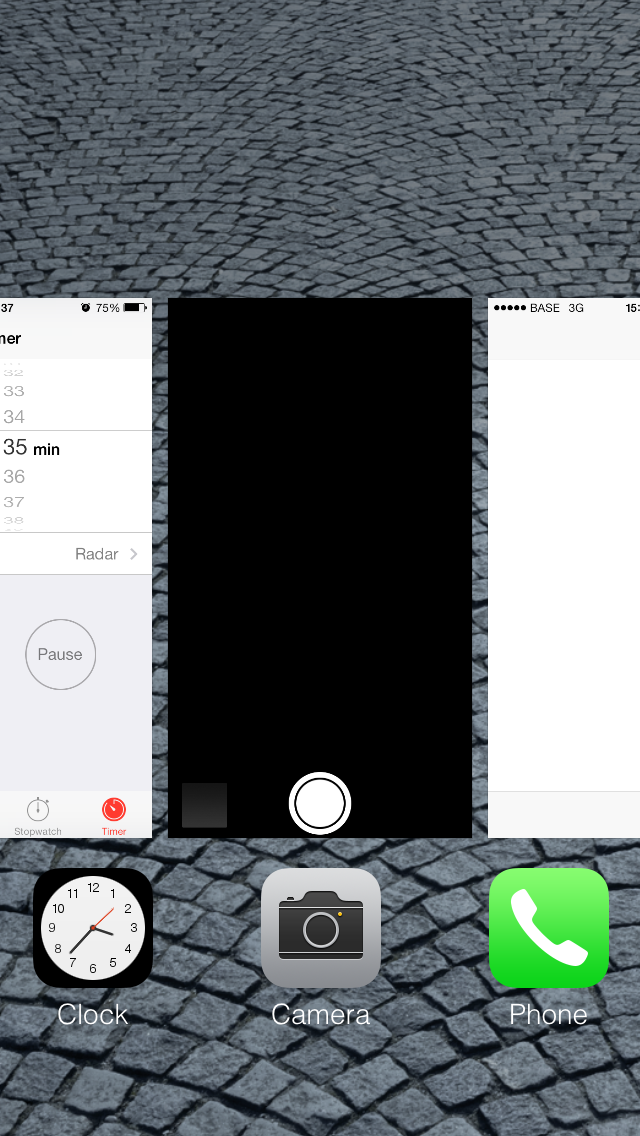
Fig.7
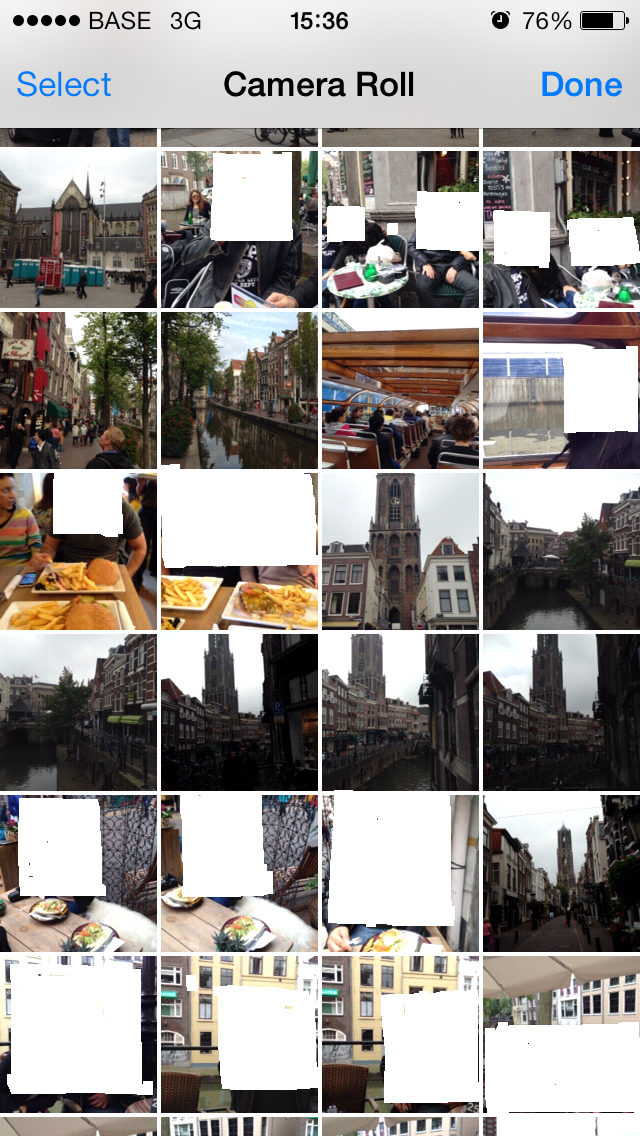
Fig.8

From here, you can share them via Twitter, Facebook, Mail, Flickr (Fig.9).
Fig.9

In order to avoid this security glitch, update your iOS:
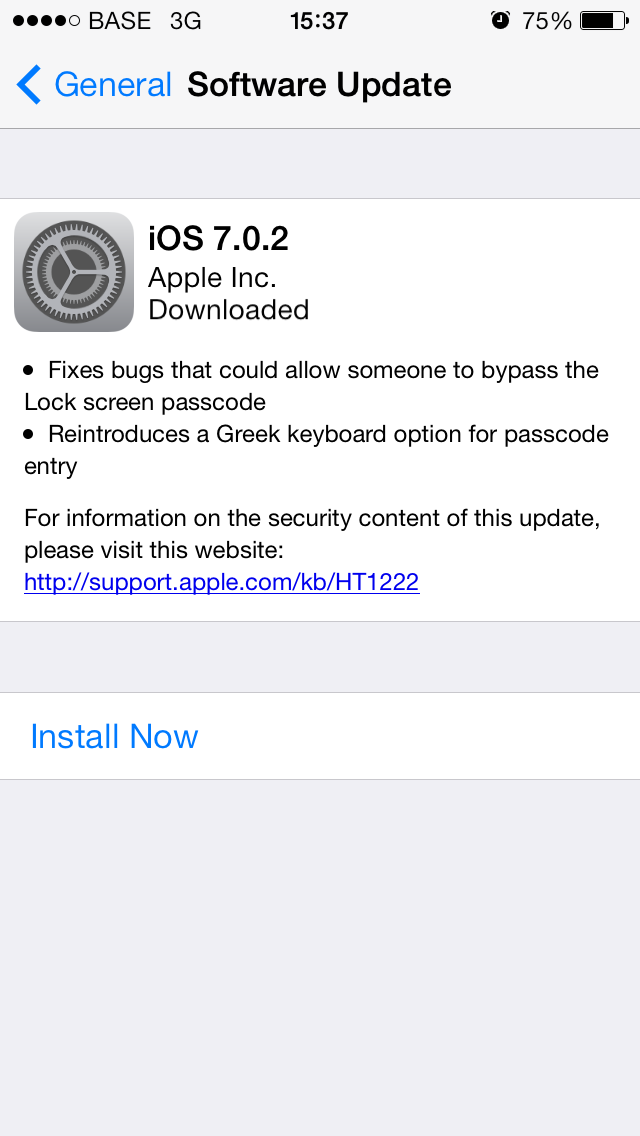
Go to “Settings” (Fig.10), then to “General” (Fig.11) and after to “Software update” (Fig.12).
Fig.10

Fig.11
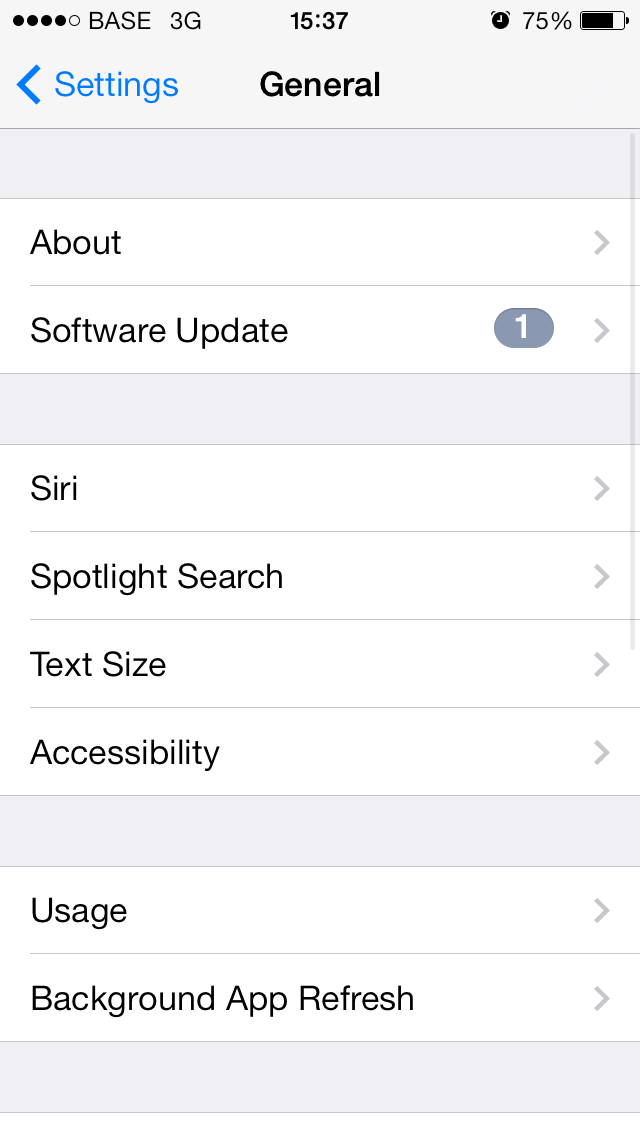
Fig.12
Done Deal!
Again, credit goes to: Jose Rodriguez, from Canary Islands (Spain).
Any questions can be submitted to: dan@e-crimeexpert.com
Additional information can be found at: http://www.e-crimeexppert.com
To find out more about Dan Manolescu, visit his LinkedIn page here.
Hit the “subscribe” button in order to be notified when new videos and Articles are posted on this blog.
Yahoo deletes IDs of inactive email accounts starting with July 15!
E-Crime Expert recently launched a series (see the first blog post here) on how you control your data stored online by different (e-mail) Service Providers. This could be done directly (by setting up an inactive account deletion time for your Google account) or indirectly (by not signing in your Yahoo account).
For those who have a Yahoo account and who have not signed in for the past year, their personal data stored under their account will be automatically deleted with no opportunity to recover it or to transfer it to anyone else by expressing their WILL as Google provides for example by offering the Inactive Account Manager tool.
Warning!
If you are not planning to have your account deleted and all your data erased (emails, pictures, chats, etc), please note that Yahoo Inc. plans to release the inactive accounts unless the current owner logs on again before July 15 (2013). After that, the (deleted) identifications will be available to all comers (as a fresh Yahoo account) and will be ready to use again in mid-August, while the data of the original user will be permanently erased!
Yahoo is resetting email accounts that have not been used for at least 12 months and issuing them to other users as they are trying to attract new users (by freeing unused email accounts) and retain current active users with IDs of their choice, the company is also giving inactive users the opportunity to retain them:
“All you have to do is log on to any Yahoo! product before July 15th. In future, these accounts will remain active by signing in at least once every 12 months, according to a Yahoo help notice, titled “We want you back.”

According to the above statement, All you have to do is log on to any Yahoo! product before July 15th, if you haven’t logged into Yahoo! for over a year, but want to keep your Yahoo! ID, and/or to log on any Yahoo! product at least once every 12 month if you want to keep your Yahoo! account active!

Any questions can be submitted to: dan@e-crimeexpert.com
Additional information can be found at: http://www.e-crimeexppert.com
Hit the “subscribe” button in order to be notified when new videos and Articles are posted on this blog
www.e-crimeexpert.com
E-Crime Expert for Android

